Introduction
In this article you will learn how to create link constraints in requirements management to ensure coherence and consistency in your project and how to prevent user errors and inconsistencies when creating links between requirements. You'll also discover a step-by-step guide on creating link constraints and handling inconsistencies by bulk changing link types and link direction. Plus, find out how Softacus' extension simplifies the process for you in just a few clicks. This article belong to the multi-article series about links. If you would like to learn more, check out our articles about Linking Techniques and Link By Attribute functionality.
Info: In scenarios we will be working with modules from one of the DOORS default templates - Automated Meter Reader, but the examples are not content-specific and you can use any modules to follow the scenarios analogously.
Overview
A link constraint in requirements management is a relationship between two or more requirements that must be maintained in order to ensure the coherence and consistency of the system being developed. Link constrains are the rules that can be established by an administrator to determine which types of links are permissible within a project or across multiple projects. Link constraints are often used to ensure that specific requirements are satisfied in a particular way or that they are satisfied within a particular context. In order to correctly implement link constraints effectively, it is important to have a clear understanding of the relationships between requirements and the context in which they are being developed.
Creating constraints for link creation and usage ensure that all link types to all requirements artifact types are consistent with each other and that the final product meets the desired specifications.
It is a useful tool to prevent user errors and inconsistencies. Different users may use different links to describe the same relationship between the artifacts. By creating link constrains you can make sure that requirements are linked in a way that is coherent and consistent throughout the entire project. An administrator can restrict which links are allowed between artifact types, as well as their direction. By default, any link type is allowed in any direction between any artifact type.
Scenario
Users in our project made too many errors by choosing the wrong link direction between stakeholder requirements in the stakeholder requirements specification and systems requirements in the system requirements specification. In our simple project, we don't need any other link types, so the goal is to allow only one link type with one direction.
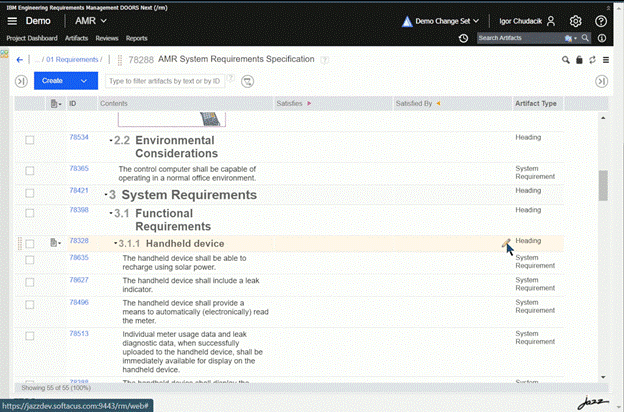
Step 0. A - Observe, that in a default state, you are able to create any link in any direction, between type of artifact (illustrated by pencil on the right side of the cell). We will observe changes in the System Requirements Specification module.

1.) When there are no constraints every link is possible to create
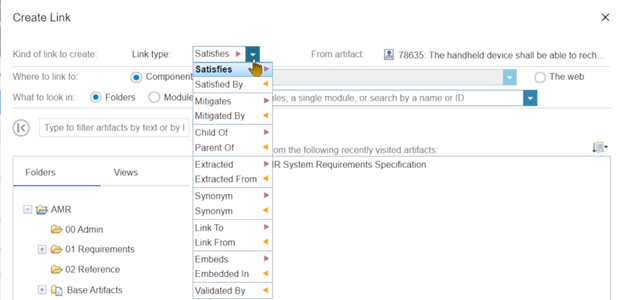
Step 0.B - Observe that when adding a link to the system requirement by clicking on the pencil in the “Satisfies column”, multiple link type options are available.

2.) Multiple options available when creating link
Step 1 - Click on the administration menu (gear icon) in the upper right corner, and select “Manage component properties”. Note: If configuration management is not enabled for your project, select “Manage Project Properties”

3.) Select "Manage Component Properties"
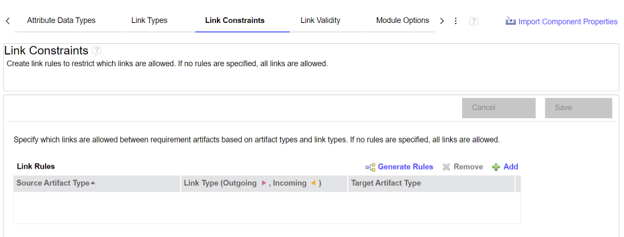
Step 2 - Select link constraints

4.) Select "Link Constraints"
Step 3 - Click on +Add and create a new rule with the following properties.
- Artifact type (link start): System Requirement
- Link type: Satisfies
- Artifact type (link end): Stakeholder Requirement

5.) Select "Add"
Step 4 - Save the changes

6.) Save the changes
Step 5 - Go back to the System Requirements Specification module, click refresh and observe changes. Now, only system requirements artifacts may be linked and only in the outgoing direction, illustrated by the only non-crossed pencil.

7.) Not editable links after constraints were created
Observe the whole process in the animation below.

8.) Creation of Link Constraints - animation
One-click Rules Generation
Creating a large number of link constraints may be a time-consuming task. If you would like to create link constraints based on the already created and used links and relationships, you can use the “Generate Rules” function. With just only click, relationships between used link types and artifact types are analyzed and link constraint rules are created accordingly.

9.) Generate rules option
Handling Inconsistencies by Bulk Change of Link Types and Link Direction
In complex projects, there might be a need to change the link type or direction of already created links.
Reasons may span from simple user errors as we described in the introduction, where different users used different links to describe the same relationship between the artifacts in the project without link constraints. Another use-case may be the decision of creating new custom links or merging links of different types into one link type.
Regardless of the reason, the result may include manually deleting and adding several thousand links.
To simplify this process, Softacus created an extension that does the link change for you in a few clicks. On top of that, we have also implemented link validity retention (if you have it enabled) and cross-component linking.
Simple example scenarios may look as follows:
Example 1:
After we successfully created a link between artifacts informing that stakeholders requirement #78428 is satisfied by system requirement #78635, the management decision was to use “Link To” and “Link From” link types, to represent the relationship between artifacts. Our goal is to change all links accordingly.
- Step 1 - Choose “Link type to be changed” as “Satisfied by”
- Step 2 - Choose “Link type to be created” as “Link from”
- Step 3 - Click on “Change”
*Alternatively, you can choose links of which artifacts should be changed, however, our goal was to change all links to adhere to the new management rules.

10.) Link Type Change showcase
As you can see in the image below, the link was successfully changed to the “Link from”

11.) Link changed via widget
There is no need for any additional changes, as the other end of the link was also automatically changed to reflect the new link type. In the image below you can see, that the other end of the link was changed from “Satisfies” to “Link To”

12.) Link changed
Example 2:
Another simple scenario may be a situation, where we need to change the link direction.
In our example, we will change the direction of the newly changed link. Therefore in the end result the link direction in AMR Stakeholder requirements specification must change from incoming (“Link From”) to the outgoing (“Link To”).
- Step 1 - Choose “Link type to be changed” as “Link From”
- Step 2 - Choose “Link type to be created” as “Link To”
- Step 3 - Just to show the second option, we will select to make a change only to the selected artifact
- Step 4 - Click on “Change”

13.) Link Type change showcase with selected artifact
As you can see in the image below, the change was successful and the selected link was changed to the “Link To”

14.) Change of the link in selected artifact
Similarly to the previous example, there is no need for any additional changes, as the other end of the link was also automatically changed to reflect the new link direction. In the image below you can see, that the other end of the link was changed from “Link To” to “Link From”

15.) Link changed in selected artifact
Softacus Services
We, in Softacus, are experts when it comes to consulting and service delivery of IBM software products and solutions in your business. We help our clients to improve visibility and transparency when licensing and managing commercial software, providing measurable value while increasing efficiency and accountability and we are providing services in different areas (see Softacus Services).
IBM ELM extensions developed by Softacus are free of charge for the customers who ordered IBM ELM licenses via Softacus or for the customers who ordered any of our services. If you are interested in any of our IBM ELM extensions, you found a bug or you have any enhancement request, please let us know at info@softacus.com.
Related and Referenced Topics
Blog Articles:
Basics of Links and Link Types in IBM DOORS Next Generation - learn the basics about the linking and link types in IBM DOORS Next.
Linking Techniques in IBM DOORS Next - article explaining basic concepts and showing multiple ways of creation of links between artifacts.
Link By Attribute Feature in IBM DOORS Next - the article explains how to use the "Link by attribute" function to automatically create, update, or delete one or more links between artifacts based on values in the attributes of the artifact.
Softacus Widgets:
Link Switcher - widget developed by Softacus, that converts the context of artifacts links in a very short time.
Module Link Statistics - extension that provides users with a quick overview of the amount of the links in specific link types in a module.
Link Type Change- extension developed by Softacus designed to enhance the functionality of DOORS Next Generation by allowing users to manipulate the direction of a link or convert it to another type of link.
Links Builder- extension that allows the users to create a link between two artifacts in DOORS Next Generation according to the certain rules.
Link by Foreign Attribute - this extension allows users to create links between artifacts in the selected module(s), based on the attributes values.
Show Attributes of Linked Artifacts - this extension shows the attributes and links of the artifact that is currently selected.


